↖ Resize Master, Download, Support
Help reference for Resize Master
Overview
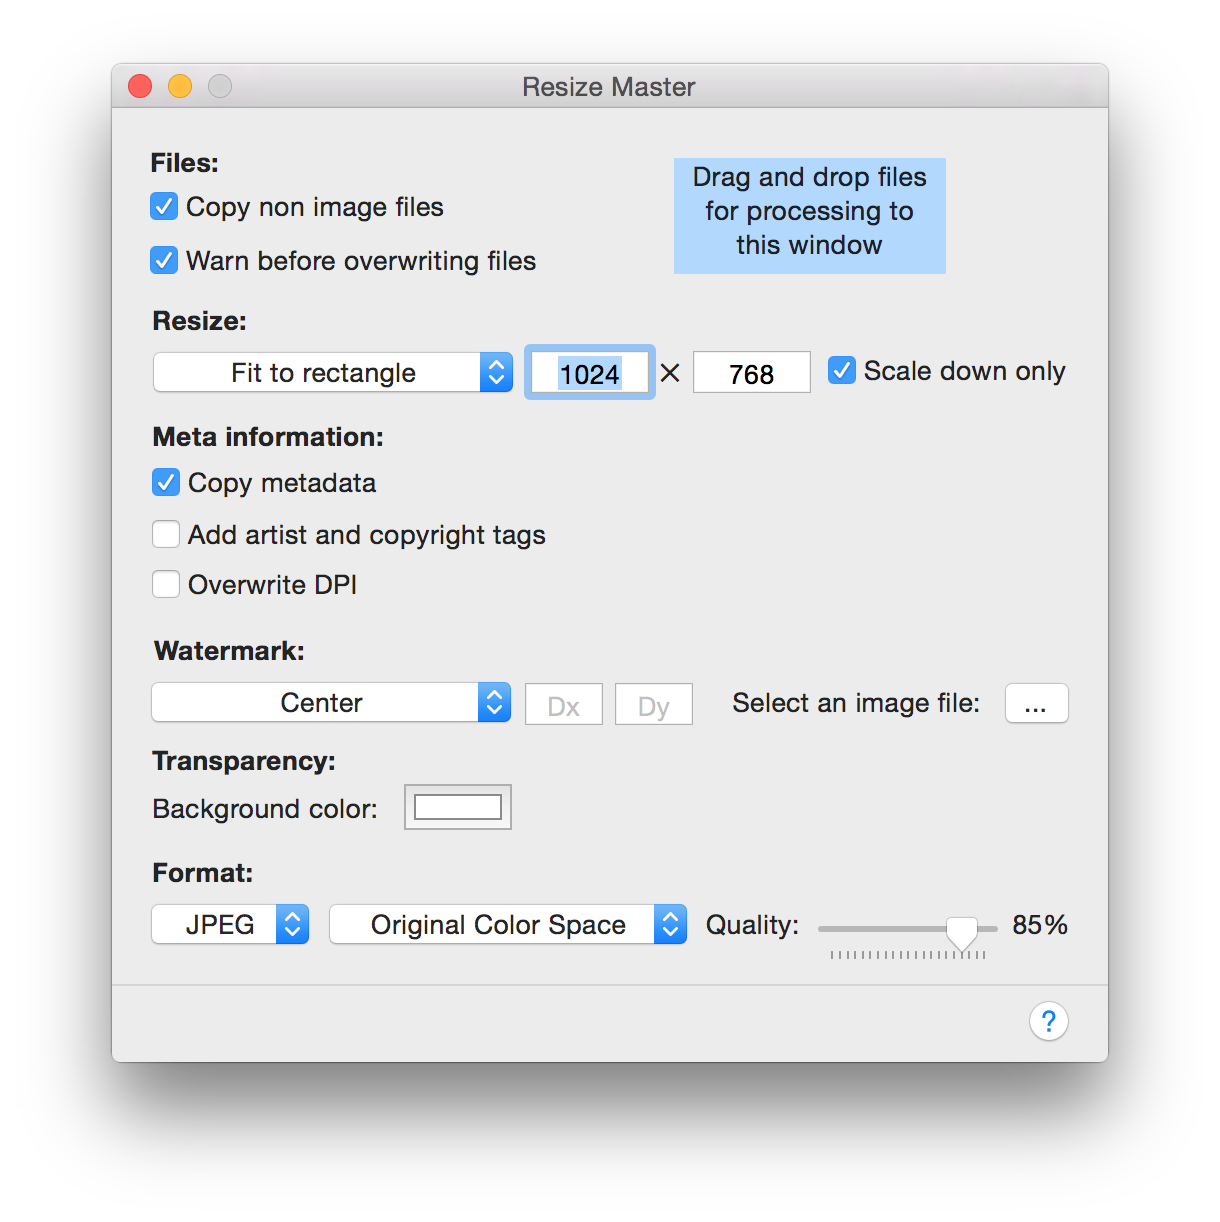
Resize Master lets you batch resize and apply a watermark to a set of images. Also it allows to specify output image properties such as copyright meta data entries, format or color space. All options are presented on a single window for an easy and quick access.
Just drag and drop source images or a folder with images for processing to the application window. After that you will be prompted to select a destination folder to output processed files. After destination folder is selected the processing starts immediately.
Processing options
The processing options are described in the order they appear on the app window, from top to bottom.
Files:
Copy non image files. This checkbox tells what to do if a non image file is encountered among source files. If check box is set then such a file will be copied to the destination folder, otherwise it will be skipped.
Warn before overwriting files. If checkbox is set then the application will ask before overwriting files, otherwise it will silently overwrite them by new output files.
Resize:
This parameter section specifies how images are resized. The popup button changes the resizing mode. It has following entries:
- Fit to rectangle scales input image proportionally, limiting output image size by the specified width and height.
- Scale by width scales input image proportionally so the output image has specified width.
- Scale by height scales input image proportionally so the output image has specified height.
- Scale by percent scales input image proportionally by the specified percent.
- Crop to aspect ratio performs central crop of the input image so that output image has specified aspect ratio. Aspect ratio is specified for a landscape oriented image, for a portrait oriented image width and height are flipped. Images are not scaled and not resampled in this mode.
- Crop to aspect ratio then fit to rectangle performs crop as in “Crop to aspect ratio” mode with aspect ratio of the specified rectangle, then scales image to fit the specified rectangle.
- Do not resize leaves image dimensions intact.
Scale down only checkbox forbids enlarging input images in any manner if set.
Usage examples of these resize methods:
- if you would like your image sides to be not larger that 1000 pixels then use “Fit to rectangle” mode with both width and height set to 1000.
- if you would like only width of your photos not larger that 1000 pixels then select “Scale by width” with width set to 1000.
- To convert your DSLR camera photos with aspect ratio 3:2 to photos with 4:3 aspect select “Crop to aspect ratio” mode and set width to 4 and height to 3.
- To create web gallery with square 100 pixel side thumbnails select “Crop to aspect ratio then fit to rectangle” with both width and height set to 100.
Meta information:
This section controls how metadata is transferred to output files.
Copy metadata. If this checkbox is set most of the metadata tags (EXIF, IPTC and TIFF tags, etc.) from original files will be transferred to output.
Overwrite DPI. This check box and an accompanying text field allow to set a specific DPI value that will be written to the output files.
Add artist and copyright tags. Set this to add corresponding tags to output files.
Watermark:
To add a watermark to your images first select its position from the popup button. Then select a watermark image. Images with transparency do best as watermark images. Additionally you can set the Dx and Dy entries containing margins from image edges to finetune watermark positioning (except for “Center” mode where it is a shift from center).
Transparency:
Background button sets a color that is used in case when source files have transparency. By default it is set to fully opaque white color.
Format:
The first popup button specifies an output format (JPEG, TIFF or PNG). The second popup button sets an output color space. If the “Original” option is selected then the color space from source file is used (this feature is supported only for 3 component color spaces with RGB color model), otherwise the image is converted to sRGB/Adobe RGB.
Support
Please send your suggestions and bug reports to email:
|
Follow @boltnevstudio
Copyright 2010-2016 Alexander Boltnev, Olga Kacher. |
|
 Focus Stacker
 Panorama Stitcher
  Print To Scale